Mostrando las entradas con la etiqueta Router. Mostrar todas las entradas

How to view IP router (WiFi and cable) Windows 7, 8, 10.

One of the most used network elements for its features and ease of configuration are the routers which are responsible for interconnecting various devices in the network.
Sometimes it is possible that, for administrative or management reasons, it is necessary to access the router to edit some adjustment and for this we must know the IP address of the gateway or Gateway and thus access it.
To know the IP address of the router we can go directly to the manufacturer's manual but in many cases we do not have this manual at hand, so this option does not apply in most cases.

1. Know the IP address using ipconfig in Windows 10, 8, 7

The ipconfig command allows us to obtain various parameters of the network in a complete and detailed way, and thanks to it we will be able to know which IP address of the router we have.
Step 1

To use ipconfig we must access the command prompt using the following key combination [R + Symbol of windows] and in the displayed window execute the command * cmd and press Enter or OK.
Step 2

Once we access the console, just run * ipconfig and this will be the result obtained.
There we can see detailed information of each network card with its IP address, MAC address and assigned gateway. The IP address of the router can be found in the line "Default gateway"

2. Know the IP address using the Network Center in Windows 10, 8, 7

Step 1

The next alternative to use is to access the network center and shared resources in the following route.
  • Control Panel
  • Network and Internet
  • Center network and sharing

Step 2

There we click directly on the "Ethernet" line, or name of the connection, located on the right side and the following window will be displayed:
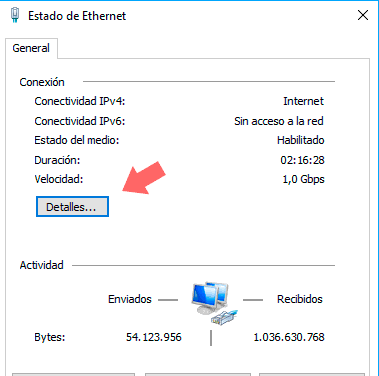
Step 3

Click on the "Details" button and the IP address of the router will be found in the line "Default gateway":


3. Acceder al router en Windows 10, 8, 7


Once we know the IP address we can access any browser and from there enter the IP to access the router:


Thus we have seen how to know in a simple way the IP address to manage the router in Windows environments.
SOURCE: solvetic.com

How to share a hard drive in a network through the router


There are external hard drives ready to connect directly to our router through the network cable, there is a method that many users do not know to share any external unit and that is accessible from any device that shares access point. Many routers include a USB connection on the back that, in addition to being used for maintenance or firmware update, allows you to connect a disk drive and easily share it on the network.


    Create a USB network drive step by step
  • In Windows, we go in the browser to My Computer, specifically to the root where we can see all the connected units. We search the option Connect to network unit in the top menu.

  • In the window that appears we can choose a letter to identify the unit in addition to the route where it is. To find this last, we have to find out what is the IP of our router, being the easiest way through the command line. To access it, we must type CMD or Command Prompt in the Run space (Windows 7) or in the smart search menu of the Metro interface (Windows 8).

  • When the command line appears, write ipconfig and press the enter key. From among all the data that appear we look for the one that puts determined Gateway and we point the IP in question.


  • Again we go to the Execute field and introduce the IP of the router that we just found preceded by two inclined bars (For example \\192.168.0.1). When doing this and clicking on Finish, a folder with the name of the unit connected to the router will appear, which will help us to compose the longed route that we must introduce. (For example \\192.168.0.1\share\USBDisk_1).

  • After all this procedure, if we go back to My PC we will have our brand new disk drive totally accessible for our necessities.


    points to consider
  • Although we have only one USB port in the router, nothing prevents us from making a HUB and connecting several units simultaneously, stacking with successive network identifiers and being able to split and delimit the access range for each of them.
  • In certain circumstances, especially when using pendrives or USB drives of small size, the free and occupied space of the unit can be displayed erroneously, although the content of the files will show it correctly.
  • Keep in mind that this unit will only be accessible from a computer connected to the network of the router in question, so we can not see it through the Internet. If we want to do it easily without resorting to configuration processes not suitable for inexperienced hands, nothing better than pulling TeamViewer or any other remote desktop service.